Thursday, July 12, 2012

Security Node demo

I created a demo recently to show off the security node I've been working on implementing using JeeNodes. This is not the final version (though the hardware is pretty close to final), eventually I want to use something like HouseAgent to control the entire system.

This was based on my work in reverse-engineering my security system.

Hardware
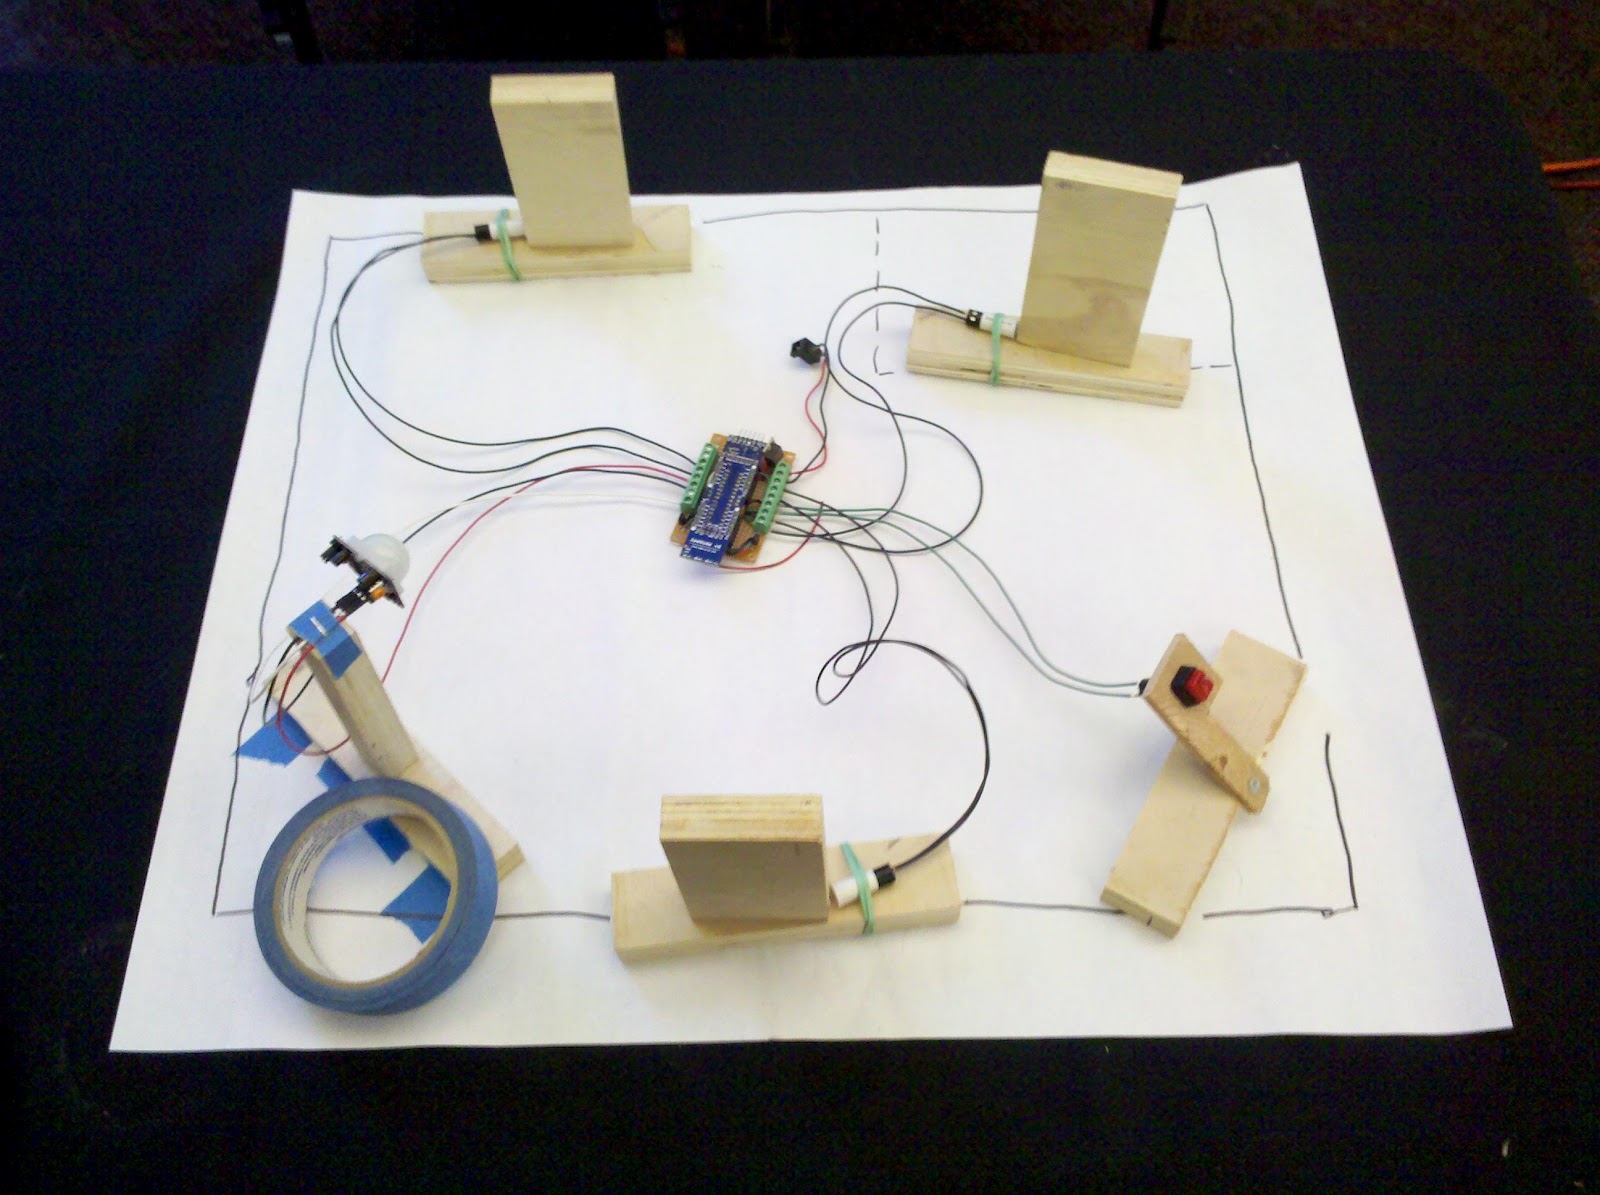
Very rough model of my house with simulated doors, panic button, and motion sensor.  The JeeNode is in the center.
The hardware consists of a JeeNode attached to 3 magnetic door sensors, a push button, a temperature sensor, and a motion sensor (with controllable power).  I built the circuit on protoboard since it is a one-off project and the circuit is pretty simple.  It attaches to the JeeNode via the standard port connectors, so it's a little like an arduino shield but with the JeeNode layout.

I decided to use this project as an excuse to try out Fritzing.  I primarily wanted to try this since I thought it might be a decent tool to use to lay out the components on the protoboard, since I usually use EagleCAD but it doesn't allow you to work with protoboard.  The breadboard view in Fritzing worked well for this but I still think I could have done it more quickly with pencil and paper.  But at least now I have a decent (if messy) electronic version.

The interface is simple.  The switches are wired directly to the digital inputs of the various JeeNode ports (also using some of the unused analog inputs as digital inputs).  I use the ATMega328's internal pull-up resistors to save some components in the schematic.  I used a 7805 voltage regulator to bring the 12 volt supply's voltage down to something more reasonable for the JeeNode.  The 5V is regulated further to 3.3V by the JeeNode's on-board regulator.


I added a couple of transistors to the circuit to control power to the motion sensor and siren which both use 12 volts.  I also inserted a switch in the siren circuit so there's a hardware way to turn the siren off just in case there is a software failure (the siren is REALLY loud).  While I'm testing things out I'll probably only have the siren circuit enabled while I'm home so I can monitor things.

Firmware
The firmware is pretty simple and has lots of room for improvement.  It should be noted that I haven't done any work to improve the power usage of the firmware since this node will be wall-powered (the motion sensor and siren require way too much power to be battery powered).  The sketch polls all of the inputs every 2 seconds and sends out a packet with the sensor readings.  It also checks for received packets that contain one of two commands: to power up/down the motion sensor or to turn on/off the siren.

In the near future I will probably make this sketch event-based; it will only send sensor packets when one of the inputs changes value (or once when the node first powers up.  I'll also probably make it handle a 3rd command to poll all of the inputs and return a packet with the data (force an event).  Since this node will always be wall-powered I probably won't bother with using the power management functions available in JeeLib.

Host Software
I wrote the host software in LabVIEW.  This is a prototype and will eventually be re-written to be a web-based interface (perhaps using HouseAgent).  The VI monitors the serial port for messages from a gateway JeeNode running the standard RF12demo sketch.  It then parses these messages and extracts the sensor value from them.  Based on pressing buttons on the front panel the VI will also send messages to the node to turn on power to the motion sensor; it then starts a timeout to allow the motion sensor time to initialize after power up.

I used Sketchup to create a quick, not-to-scale, 3D floor plan of the first floor of my house.  I think it spruces up the front panel nicely.


Screenshot of the host-side UI


The host including the host-side JeeNode connected via USB


Tuesday, July 03, 2012

Reverse Engineering my Home Security System

I've been reverse engineering the security system that came installed with my house.  My ultimate goal is to re-use some of the sensors for my own home automation project while bypassing the old control board.

A bit of theory

The system works by monitoring multiple "zones" (up to 6 for the system in my house).  Each zone is really just a digital input that has a switch wired to it that can be open or closed. The control board can be configured on what state constitutes an alarm (for instance, a closed switch on Zone 1 means that the front door is open).  There is a bit more optional complexity that can be added to each zone as well.

The first complexity is that multiple sensors can be added in the loop that the controller monitors.  A good example of this is that you could put several monitored windows one a single zone by wiring the switches in series with one another in such a way that if any of them opened then the whole circuit would open; this would be like wiring the window states into an logical OR gate.  Note that this would also work even if the window switches were normally open (NO) switches, but in that case you would wire the sensors in parallel, such that normally the whole loop would be open but when a window opened one of the switches would close and the controller could detect that state.
Control loop for multiple Normally Closed (NC) sensors 

Control loop for  multiple Normally Open (NO) sensors

Another complexity is that you can use what are called end of line (EOL) resistors in the zone loops.  The idea of these resistors is to provide a third state to the loop besides open or short circuit.  By having a third value on the loop and using that as the nominal value you can detect when a fault condition occurs (either short circuit or open circuit).  The controller can be configured to handle EOL resistors (whether to use 2 or 3 states for a given loop).  In the example below the zone loop should normally read a resistance of R, but when one of the sensors opens then it should read an open circuit.  If the loop reads as shorted then we know that something is wrong with the loop.

Control loop for NC sensors with EOL resistor

Typically all of these sensors will be hard-wired from where the thing they are monitoring actually is.  For instance, if you might have a magnetic reed switch embedded in your front door frame which is wired back to your central control box.  Depending on how the sensor was installed, the wires will be run through the walls, under carpeting, or under the base boards against the wall.

Deciphering my system

My security system is a DSC PC1550 with a DSC 1500RK keypad.  I found an installer's manual online which helped a bit in deciphering things, but mostly I learned quite a bit from looking at the diagram on the inside of the control box (pictured below).  It appears like all of the sensors are connected to the main control board via a screw terminal block

By inspecting what was wired and examining door frames for the tell-tale plastic circles that indicate a magnetic door sensor, I determined that I had 3 door sensors, a motion sensor, a panic button, and a siren.

I started off by checking the resistance of each zone loop with my multimeter.  The motion sensor has to be powered so I supplied 12 volts to it and it worked like a charm.  The panic button also worked.  I hooked up 12 volts to the siren and it worked too.

When I tried the door sensors all of them registered as open circuits regardless of the position of the door.  I started troubleshooting: I pulled  one of the door sensor out of its whole and checked that it did indeed close the switch when a magnet was near, and I checked that all of the magnet and switches were close enough that the switch should trigger when the door was closed.  After that I started pulling up carpet to find the wires that were run under the carpet, and eventually I determined that the wires were accidentally cut during installation of new carpet.

I tracked down all 4 of these wire breaks (that's right, one of the door channels actually had two breaks in it) and fixed them, which involved prying up lots of carpet in my living room.  But eventually I got all of the door sensors working again.

And the good news is that all of these sensors act as switches and should be easy to interface to my own security monitoring hardware.  The only thing I haven't reverse engineered yet is the DSC 1500RK keypad.  I wasn't able to find solid information on the serial protocol it uses, so I'll leave that for later.  My plan is to eventually have my entire house controlled via my smart phone, so I don't care that much if the wall-mounted keypad works or not.

The diagram on the inside of my security control box

Monday, July 02, 2012

Appliance Repair

At least once a year, I have some kind of appliance break-down: my refrigerator stopped chilling food, washing machine electronics went bad, dishwasher started leaking, icemaker stopped making ice – the list goes on and on. Against my wife’s better judgment, I decided to try and fix these problems myself.
I like the idea of repairing things rather than throwing them out and getting new ones. There are so many benefits, including:
  • Saving money by not hiring a repair person and even more money by skipping out on buying a new appliance
  • Feeling a big sense of accomplishment when you can find and fix a problem yourself
  • Having a great excuse to take something apart and figure out how it works
  • Helping the planet by keeping old appliances out of a landfill

6 General Tips for Repairing Appliances

1. Reader’s Digest Fix It Yourself manual

This book is a great resource for troubleshooting and repairing everything in your house including appliances. I received this as a gift years ago, and it has saved me hundreds of dollars in repair costs. The sections on individual appliances are short and sometimes lack the depth required for a complete fix, but they usually have excellent diagrams and troubleshooting guides. I often go to this book first for troubleshooting appliance problems.

2. Learn to use a multimeter

A multimeter is an inexpensive tool that can measure voltages and resistances (and sometimes other electrical properties). You should be able to find a decent one for $10-20. Make sure that it measures AC and DC voltage and resistance, as these will be the most common measurements you will need to make. I would also recommend getting a model with an audible continuity check feature. This will make a beeping sound whenever you touch the multimeter’s probes to something that is electrically connected; this makes it handy to do continuity checks on wires without having to keep your eyes on the multimeter’s display. Click here for a good tutorial on multimeters.

3. appliancepartspros.com

This is a great website for ordering appliance parts. Shipping is inexpensive and fast – the company is based in Oklahoma so parts often arrive in Austin the next day. This site is also a great resource for repair advice. They have extensive forums, and by searching for the model number of appliance you can use an interactive parts diagram help you quickly find the exact part you need.

4. Google search for service manuals

Often appliance manufacturers will create detailed service manuals that they release only to "authorized service technicians." By searching for your manufacturer and model number along with the phrase “service manual” you can usually find online versions of these usually inaccessible manuals. These manuals are great and tend to include very detailed troubleshooting guides and steps on replacing individual parts of the appliance.

5. YouTube videos

YouTube is a great resource for figuring out how to disassemble an appliance, which is often the hardest part of the repair. I start by searching for videos of the exact model of the appliance, but sometimes I find a different model from the same manufacturer. Even if they are not the same model number, these videos are still useful, as manufacturers tend to use the same general design for many different models of an appliance. For instance, if you can find a video that shows how to disassemble one model of Whirlpool washing machine, it will usually still be of help because they tend to put hidden screws or connectors in the same places from model to model.

6. Whirlpool and GE do it yourself repair manuals

I have not used these manuals, but Whirlpool and GE both have a series of repair manuals for the do-it-yourselfer. There tends to be one manual for each appliance type – one for dishwashers, one for refrigerators, and so on.

When You May Need Help from the Experts

Occasionally you might be faced with a repair that’s beyond your abilities, and it is wise to know when to admit defeat and call in a professional repair person. Sometimes a repair costs more than replacing the whole appliance, or the repair requires lots of very specialized equipment – like when the refrigeration system goes bad in a refrigerator. And frankly, sometimes time just is not on your side like when you have a mountain of clothes that need to be washed right away or all your frozen food is in a cooler.
There are also instances when a repair will involve something you are not comfortable doing – for instance, I do not repair things that involve natural gas because it makes me nervous. In those cases, do not be afraid to call a professional repair person. If you do have to take that route, I encourage you to watch and learn from what that repair person does. Generally, if you explain to a repairman that you would like to learn how to make repairs and are genuinely interested, they will not mind if you look over their shoulder as they make the repair. I have found that they will be pleased that you are interested and will explain lots of “insider” tips as they make the repair.
Your friends and family might think you are a little crazy at first for trying to repair your own appliances, but after you have pulled off a successful fix, everyone will be impressed by your appliance repair wizardry.

Disclaimer: The author of this post accepts no responsibility for any injuries or damages that may occur from any advice in this posting.  Doing repairs can be dangerous and if you are unsure of something please consult a professional before attempting a repair.